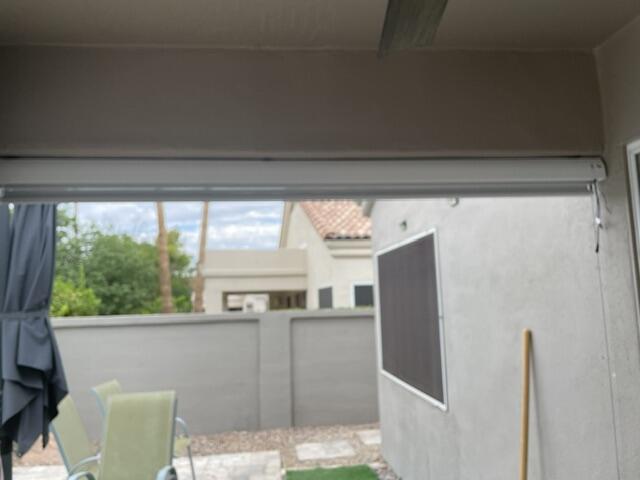
Stop Mounting Your Exterior Patio Shade Inside Porch Columns
I remember the first time I tried to 'fix' my west-facing porch. It was a humid July afternoon, and the sun was hitting the cedar table with such intensity that we were all wearing sunglasses just to eat grilled corn. I did what most people do: I ordered a custom exterior patio shade and mounted it neatly inside the column frames. I wanted that 'built-in' look, flush and tidy. I thought I was being a design genius.
Twenty minutes after the sun started its descent, I realized my mistake. Because the mounting brackets and the roller mechanism take up physical space, the fabric was nearly two inches narrower than the opening on both sides. Those two-inch gaps acted like a magnifying glass, letting in a blinding vertical sliver of light that hit me right in the eye. It didn't matter how expensive the fabric was; the installation method had failed the room.
Quick Takeaways
- Inside mounts leave 1-2 inch light gaps on both sides due to hardware clearance.
- Outside mounting across the header beam creates a complete visual and thermal barrier.
- A 3-inch overlap on each side is the gold standard for total sun coverage.
- Cable guide systems are non-negotiable for outside-mounted shades to prevent wind flapping.
The 5 PM Laser Beam (Why Inside Mounts Fail Outdoors)
Inside-mounting is the darling of interior window treatments because it shows off beautiful trim. But on a porch, your 'trim' is usually a structural 6x6 post or a chunky wrapped column. When you tuck sun blinds for patio use inside those columns, you are fighting physics. The fabric cannot go edge-to-edge because the clutch, the idle end, and the brackets need room to breathe.
The result is the 'laser beam' effect. At golden hour, the sun doesn't just gently glow; it pierces through those side gaps. If you are trying to read or enjoy a drink, that sliver of high-intensity glare makes the entire shade feel useless. You end up leaning your chair to the left or right just to stay in the shadow, which is exactly the kind of friction good design should eliminate.
The Case for the Outside Mount (And Why It Looks Better)
When you shift your mindset to an outside mount—mounting the cassette box directly onto the face of the header beam—everything changes. By overlapping the columns by a few inches on each side, you create a continuous wall of shade. This turns your outdoor sun shades for patio into a true architectural feature rather than a flimsy screen hanging in a hole.
Visually, this adds height to your porch. Just like hanging indoor curtains high and wide makes a window look massive, mounting durable outdoor shades to the face of your beam draws the eye upward. It covers the transition between the beam and the columns, creating a clean, high-end look that mimics a professional motorized screen system without the five-figure price tag.
But Won't the Cassette Box Ruin My Exterior Trim?
This is the number one fear I hear from homeowners. They don't want a 'clunky metal box' sitting on their beautiful white fascia or stained wood. Here is the secret: you don't notice the hardware if you color-match it. Most high-end porch sun shades come in powder-coated finishes like bronze, sand, white, and black. If you have white trim, a white cassette disappears into the header.
If you are a perfectionist, you can take it a step further by building a simple wood valance out of 1x6 cedar or PVC trim board. You mount the shade to the beam, then 'box' it in with matching wood. This hides the roll entirely when it is up, giving you a completely clean architectural line while still reaping the benefits of the gap-free outside mount.
How to Keep a Face-Mounted Shade From Banging in the Wind
Because an outside-mounted patio sun screen sits an inch or two off the face of the column, it can act like a sail if a breeze catches it. I once left a cheap shade down during a surprise thunderstorm, and the sound of the weighted hem bar slamming against my siding sounded like a drum kit falling down the stairs. It was a nightmare.
The fix is simple: cable guides. These are thin, stainless steel wires that run vertically from the top of the bracket to an anchor at the bottom. The shade has 'donuts' or eyelets on the ends of the hem bar that slide up and down these cables. Even if the wind kicks up, the shade stays locked in its plane. If you live in a particularly gusty area, you might wonder Are Vertical Outdoor Sun Shades Worth It For A Windy Patio—the answer is yes, but only if you use a heavy-duty bungy or cable system to tension the fabric.
Getting the Fabric Right: Privacy vs. the Backyard View
When you mount outside the columns, you are covering more surface area, which means the fabric choice becomes the dominant 'wall' of your outdoor room. You have to balance the 'openness' factor. A 1% openness is basically a solid wall—great for privacy from nosy neighbors, but it can make a porch feel like a tent. It also blocks the breeze, which can make a summer afternoon feel stifling.
For most of my projects, I recommend a 5% openness outdoor shade. It is the 'Goldilocks' of fabrics. It cuts 95% of the UV rays and kills the glare, but you can still see the shape of your hydrangeas and the pool through the mesh. When you choose outdoor sun shades for porch settings, remember that darker colors actually provide better through-visibility, while lighter colors reflect more heat but are harder to see through.
My 3-Inch Overlap Rule for Measuring Porch Shades
If you are ready to commit to the outside mount, measuring is different than your standard window. You aren't measuring the opening; you are measuring the coverage. I always use the 3-inch overlap rule. Measure the clear opening between your columns, then add at least 6 inches to the total width. This ensures the fabric overlaps each column by 3 inches.
This overlap is what prevents the light leaks and gives the hardware enough 'meat' to bite into when you are drilling into the structural posts. Because the shade is now a prominent part of your home's exterior, the woven outdoor shade texture you choose will be visible from the street. Pick a tonal, variegated weave rather than a flat plastic look; it makes the shade look like a textile rather than an industrial tarp.
Personal Experience: The Lesson of the Wrong Screws
I once spent a Saturday installing three 10-foot shades on a client's porch. I was so focused on the 'outside mount' benefits that I used the standard 1-inch screws that came in the box. Two weeks later, after a particularly windy night, one side of the middle shade had pulled right out of the wrap. The 1-inch screw had only grabbed the decorative trim, not the structural beam behind it. Now, I never use anything less than 2.5-inch stainless steel lag screws. I learned the hard way that when you're mounting to the face of a house, you need to hit the 'bone,' not just the 'skin.'
FAQ
Can I still use a crank handle with an outside mount?
Yes, and it is actually easier. With an inside mount, you are often fighting the column to turn the crank. With an outside mount, the wand hangs freely in front of the post, giving you plenty of knuckle room to spin it without scuffing your paint.
What is the best height to mount the cassette?
I prefer to mount the cassette as high as possible on the header beam, usually just an inch below the ceiling or soffit. This keeps the roll out of your sightline when you are standing on the porch, preserving that open-air feeling when the shades are retracted.
Will an outside mount work on round columns?
Round columns are tricky for inside mounts anyway. For round columns, an outside mount on the beam above is actually your only real option. You just need to ensure your bottom anchors for the cable guides are mounted to the deck floor rather than the column itself.